Introduction
Azure App Registration is essential for many Data Engineering tasks. Whether you use Power BI
API, Microsoft Fabric API, or need to ingest data from SharePoint sites, all these tasks require
you to create an App Registration and grant proper access to the application for specific
operations.
Today, we’ll walk through a comprehensive step-by-step process to register your application in
Azure and grant basic permissions. For advanced permissions used for specific tasks like Power
BI API integration, Power BI embedding, or SharePoint data ingestion, these will be covered in
dedicated future blog posts.
Learning Goals
By the end of this tutorial, you will know how to create an App Registration and configure it for
basic access so you can use it effectively in your data engineering projects.
Prerequisites
Before starting, ensure you have:
• Azure Portal access – Open portal.azure.com and log in with your account that has an Azure subscription
• Proper permissions – Either your personal account or Office 365 account with sufficient privileges
• Basic understanding of Azure services and API authentication concepts
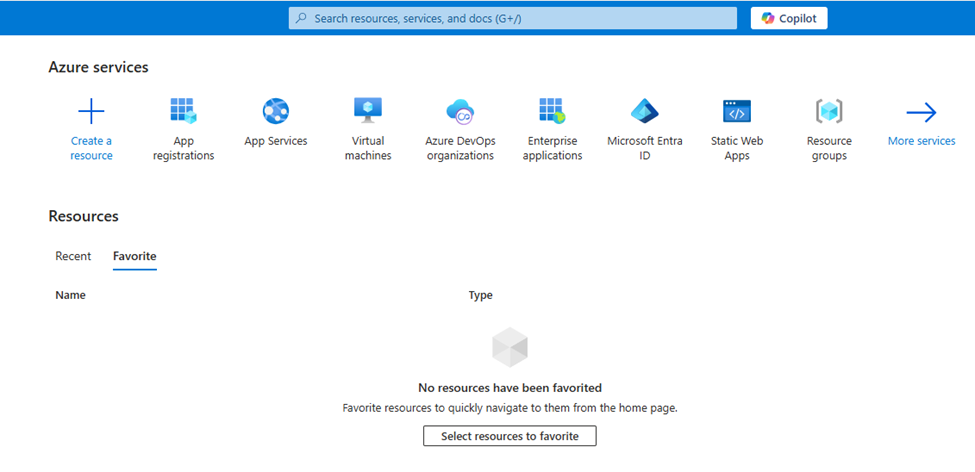
Step 1: Access Azure Portal and Login
Opening the Azure Portal
To begin creating your Azure App Registration, you need to access the Microsoft Azure Portal.
Login Process
- Open your web browser and navigate to: https://portal.azure.com/
- Login with your account that has an Azure subscription:
• Personal Account: @outlook.com, @hotmail.com, or @live.com
• Work/Office Account: Your organization’s account (yourname@company.com) - Complete authentication including any two-factor authentication if prompted
Once you login you will find the page below.
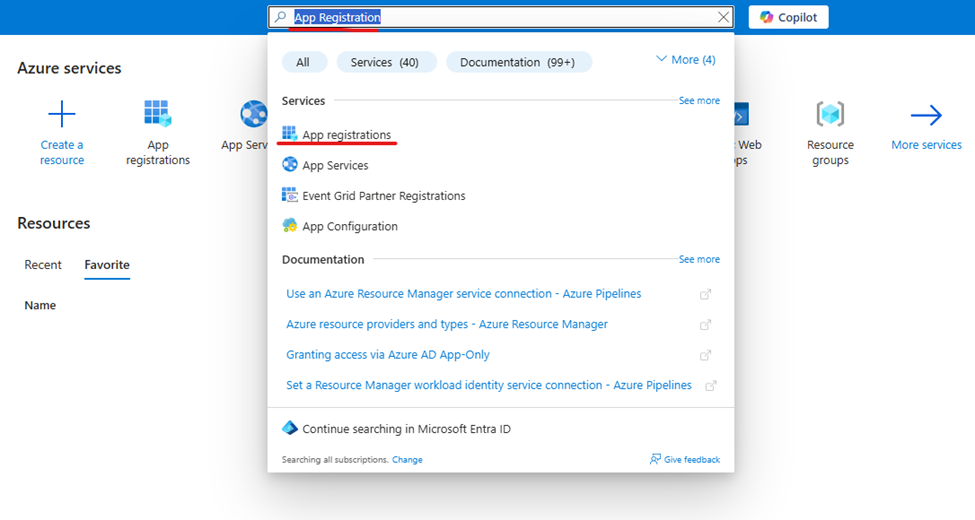
Step 2: Create New Application Registration
In the search bar at the top of the Azure Portal, type “App Registration” and click on the App
Registration option from the dropdown results.
Once you select “App Registration”, you will see the screen below. If you have already created
any applications, they will be displayed in the “Owned Applications” section. You can view all
applications in the “All Applications” section.
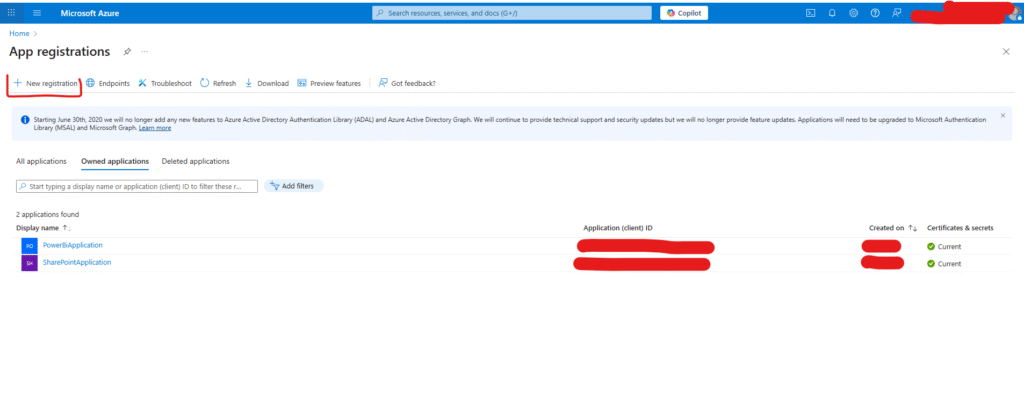
Step 3: Create New Application Registration
Click on the “New registration” button to start creating your new application registration.
Application Configuration Details
Fill in the following information:
Application Name
• Enter a descriptive name for your application
• Example: “PowerBI-DataEngineering-App” or “SharePoint-Integration-Service”
• Use clear naming conventions that identify the app’s purpose
Supported Account Types
Select the appropriate option based on your requirements:
• Single tenant: Only users in your organization (Recommended for most scenarios)
• Multitenant: Users from any Azure AD organization
• Personal accounts: Includes consumer Microsoft accounts
Redirect URI (Optional)
• Leave blank for API-only applications initially
• Add specific URIs later if needed for web or mobile applications
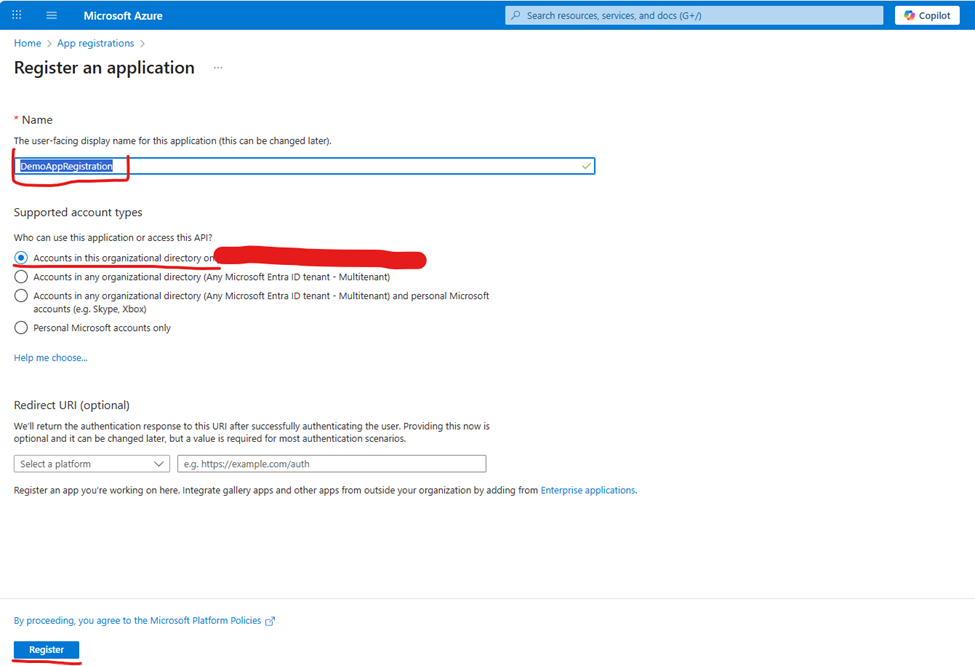
Step 4: Complete Application Creation
After filling in the required information, click “Register” to create your application.
The application will be created and you’ll be redirected to the resource page. You will see the
overview page shown below.
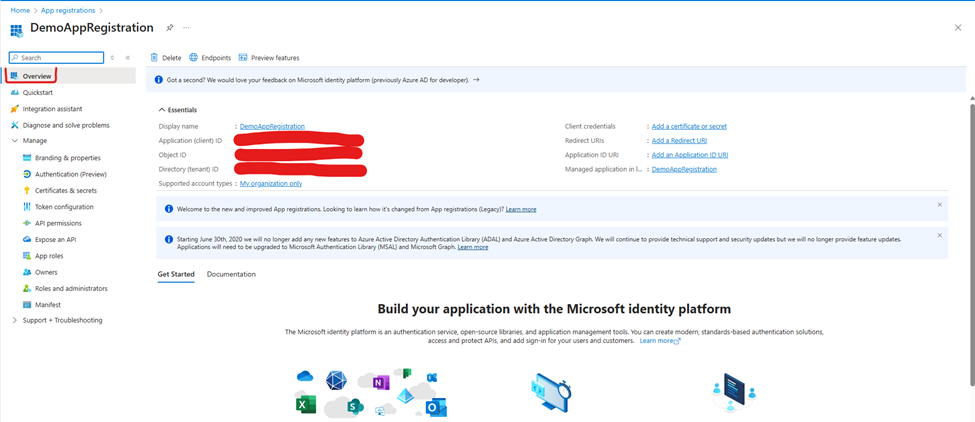
Step 5: Retrieve Essential Application Details
On the overview page, you can see two critical pieces of information:
• Application (client) ID
• Directory (tenant) ID
These details are crucial when using this application for tasks like:
• Power BI embedding
• SharePoint data ingestion
• Any Microsoft API integration
Important Note: This information is always available on the overview page – you don’t need to
store it separately as it remains accessible.
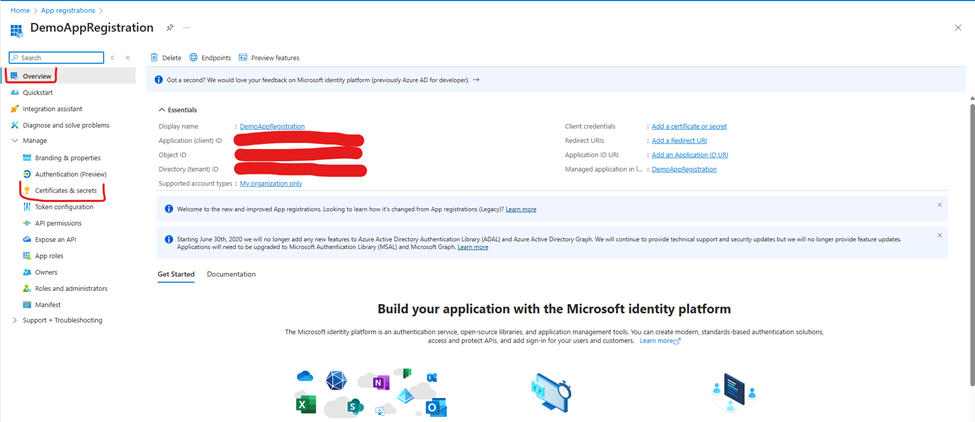
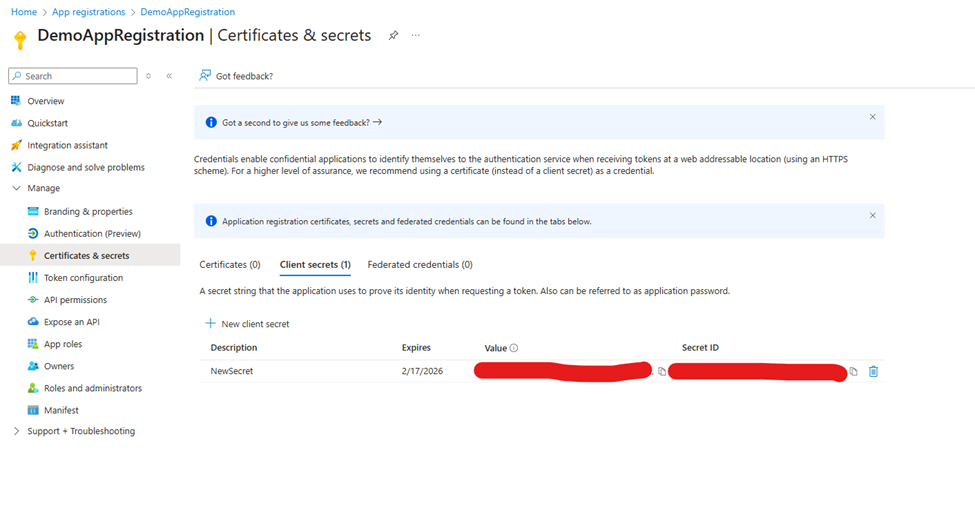
Step 6: Configure Application Secrets
Once your application is created, we need to configure “Certificates & secrets”. These secrets
will be used to authenticate the application on Azure Portal and obtain authorization tokens. This
token will be used to perform further tasks like API calls and data access.
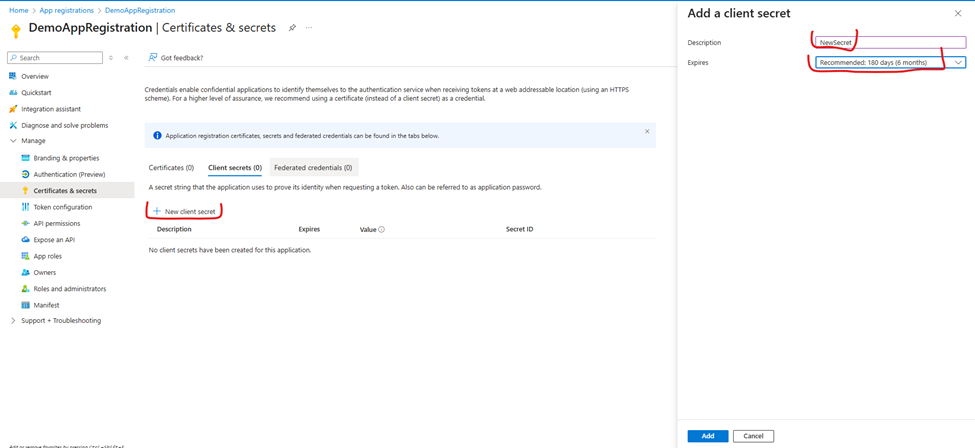
Creating a New Client Secret
- Click “+ New client secret”
- Add a meaningful description (e.g., “Production API Secret”)
- Select an expiration period:
• 6 months: For development/testing
• 12 months: For production (recommended)
• 24 months: For long-term applications
• Custom: Set your own date
Step 7: Secure Your Client Secret
Once a secret is created, you will see the Secret Value and Secret ID.
CRITICAL: Note and store both the Secret Value and Secret ID immediately. Once you navigate away from this screen, you will not be able to see the secret value again.
Best Practices for Secret Management
• Store secrets in secure key management systems (Azure Key Vault recommended)
• Never commit secrets to version control
• Set up secret rotation schedules
• Use different secrets for different environments
Step 8: Configure API Permissions
Next, we need to grant proper permissions to the application. Click on “API Permissions” in the
left navigation menu.
You will see that the default permission granted to the application is “User.Read”. According to
the permission description, this allows the application to read the profile of the signed-in user.
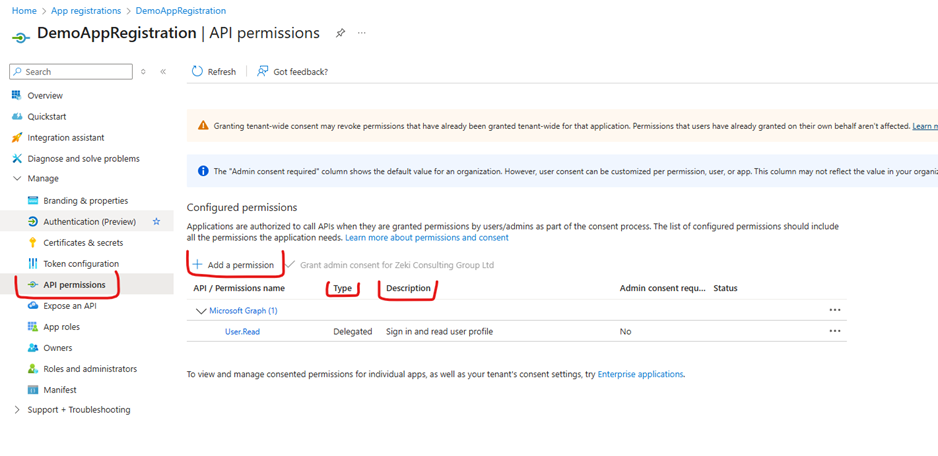
Step 9: Add Additional Permissions
Click on “Add a permission” to grant additional access rights to your application.
For most Data Engineering tasks, you will need to grant permissions on Microsoft Graph, so select “Microsoft Graph” from the available options.

Step 10: Understanding Permission Types
Once you click on “Microsoft Graph”, you will see two main permission types:
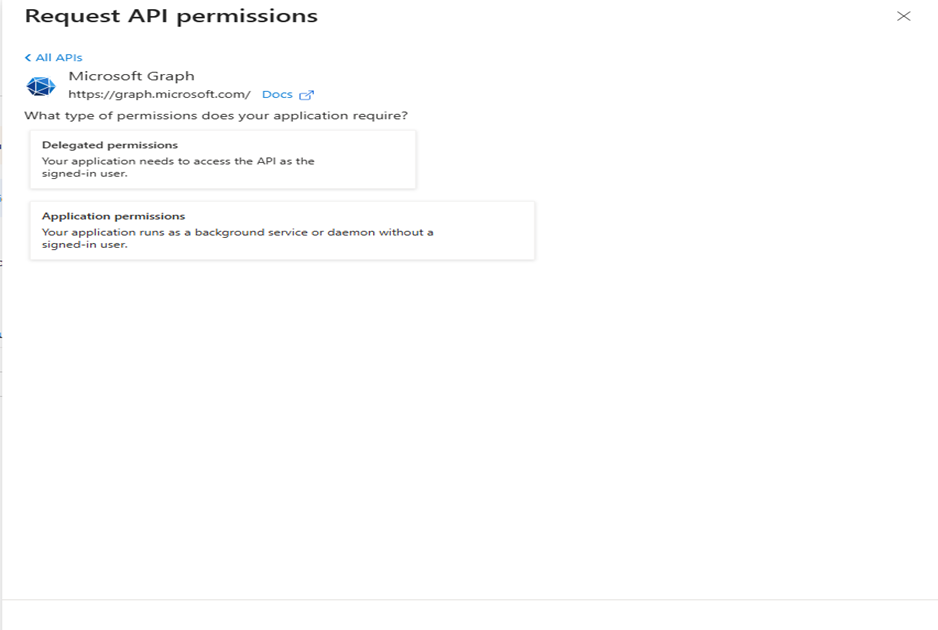
Delegated Permissions
• When to use: When your application acts on behalf of a signed-in user
• Authentication requirement: You must use username and password to get an access token
for your registered application (in our case, “DemoAppRegistration”)
• User context: All API calls are made with the permissions of the signed-in user
• Consent: Users can typically consent to these permissions themselves
Application Permissions
• When to use: When your application runs without a signed-in user (background services,
automated tasks)
• Authentication requirement: Uses client credentials flow with application ID and secret
• Admin consent: Requires administrator approval
• Scope: Application has permissions independent of any specific user
Step 11: Select Appropriate Permissions
Based on your data engineering requirements, choose the relevant permissions:
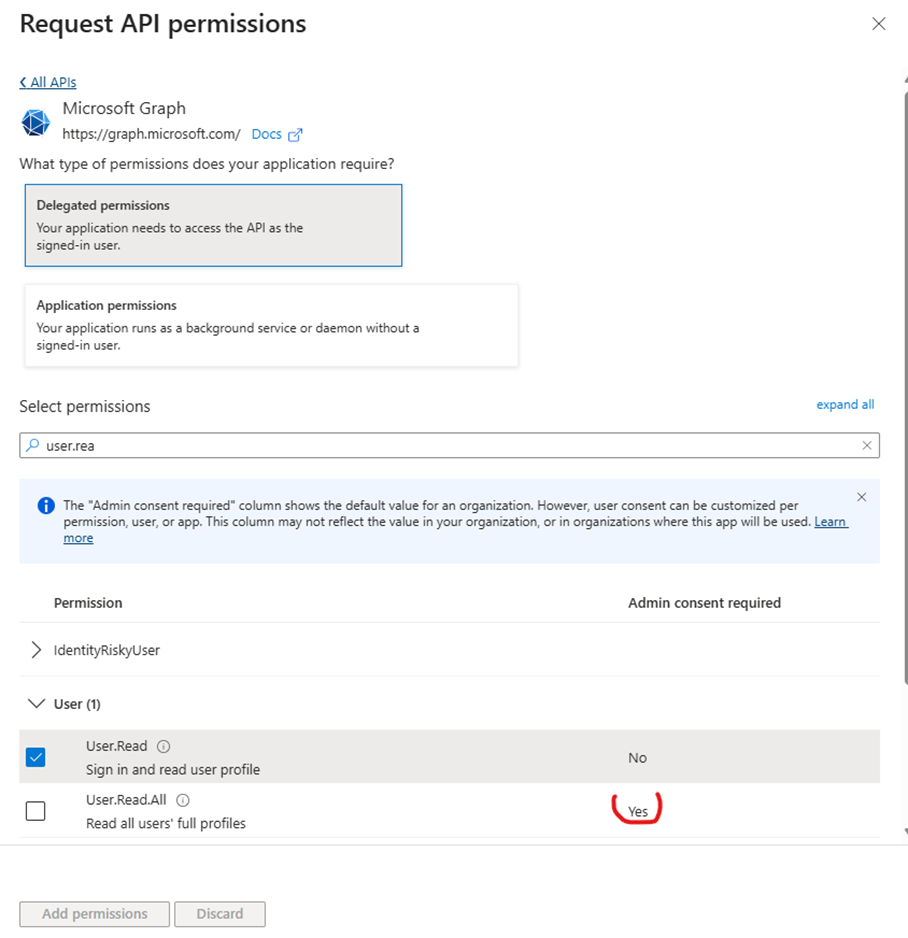
Common Microsoft Graph Permissions for Data Engineering:
• Files.Read.All: Read all files in SharePoint and OneDrive
• Sites.Read.All: Read all SharePoint sites and lists
• User.Read.All: Read all user profiles
• Directory.Read.All: Read directory data
• Mail.Read: Read user emails (if needed)
For Power BI Integration:
• Navigate back and select “Power BI Service”
• Choose permissions like:
• Dataset.Read.All: Read all datasets
• Report.Read.All: Read all reports
• Workspace.Read.All: Read all workspaces
Step 12: Grant Admin Consent
After adding all required permissions:
- Review all selected permissions in the API permissions list
- Click “Grant admin consent for [Your Organization Name]”
- Confirm the consent in the popup dialog
- Verify that all permissions show “Granted” status with green checkmarks
Important: Without admin consent, application permissions will not be effective, and your
application will receive authorization errors.
Step 13: Test and Verify Your App Registration
Collect Your Application Credentials
From your app registration, gather these essential values:
json
{
"clientId": "your-application-client-id",
"tenantId": "your-directory-tenant-id",
"clientSecret": "your-client-secret-value"
}
Basic Authentication Test
Test your configuration with a simple token request:
text
POST https://login.microsoftonline.com/{tenant-id}/oauth2/v2.0/token
Content-Type: application/x-www-form-urlencoded
client_id={client-id}&
client_secret={client-secret}&
scope=https://graph.microsoft.com/.default&
grant_type=client_credentials
Verify Success
A successful response should include:
• access_token: JWT token for API calls
• token_type: “Bearer”
• expires_in: Token expiration time in seconds
Security Best Practices
Protect Your Application Registration
• Use Azure Key Vault for storing client secrets
• Implement secret rotation policies
• Monitor secret expiration dates regularly
• Audit access to your app registration
Follow the Principle of Least Privilege
• Only grant permissions your application actually needs
• Regularly review and remove unused permissions
• Use delegated permissions when possible instead of application permissions
• Monitor API usage to detect unusual activity
Common Troubleshooting Issues
Authentication Failures
• Invalid Client Error: Check if client secret has expired
• Invalid Request: Verify tenant ID is correct
• Unauthorized: Ensure admin consent was granted for application permissions
Permission Errors
• Insufficient Privileges: Verify required permissions are added and consented
• Access Denied: Check that the correct permission type (delegated vs application) is used
Next Steps and Advanced Integration
Now that you have a working Azure App Registration with proper permissions, you can:
Power BI Integration
• Connect to Power BI REST APIs for automated reporting
• Implement Power BI embedding in web applications
• Create automated dashboard generation workflows
SharePoint Data Engineering
• Extract data from SharePoint lists and libraries
• Implement automated document processing pipelines
• Create data synchronization workflows
Microsoft Fabric Integration
• Authenticate with Fabric APIs for advanced analytics
• Automate data pipeline creation and management
• Integrate with Fabric workspaces programmatically
Conclusion
You’ve successfully created an Azure App Registration with proper authentication and API
permissions configured. Your application can now securely authenticate with Microsoft services
and access APIs according to the permissions you’ve granted.
This foundation enables you to build robust data engineering solutions that integrate seamlessly
with Power BI, SharePoint, Microsoft Graph, and other Microsoft services. Remember to follow
security best practices, regularly rotate your secrets, and monitor your application’s usage for
optimal security.
Ready to start building? Your app registration is now configured and ready for integration with
your data engineering projects. In the next article, we will see how to use this registered application to read the Data from SharePoint and Load into data lake. We will see code to authorize and get token for Application and Get file Loaded on Data Lake.
Connect with our data experts: connect@aewee.com
Consulting Services: Data Analytics & Engineering Solutions


2 thoughts on “Complete Guide: How to do APP Registration on Azure Portal and Grant Permissions”
Hallo zusammen, danke für den ausführlichen Leitfaden zur Azure App Registration! Das ist wirklich hilfreich für alle, die mit Microsoft-APIs arbeiten. Eine Frage hätte ich allerdings: Wie verhält es sich mit der Sicherheit von Client Secrets, wenn man gleichzeitig in verschiedenen Ländern arbeitet?
Ich frage deshalb, weil ich kürzlich diesen Artikel über die Anmeldung im spanischen Gesundheitssystem gelesen habe https://e-residency.com/blog/spanish-public-healthcare-registration-how-to-get-your-health-card/ und dort wird betont, wie wichtig regionale Besonderheiten sind. Gibt es ähnliche regionale Unterschiede oder Best Practices bei der Azure App Registration, die man beachten sollte, wenn man international tätig ist? Besonders im Hinblick auf Compliance-Anforderungen oder Datenlokalisierung?
Würde mich über Erfahrungsberichte oder offizielle Microsoft-Empfehlungen zu diesem Thema freuen!
Hello Amanda,
Thank you for your thoughtful question about managing secrets and app registrations across different countries.
Short Answer:
Store all secrets in Azure Key Vault (mandatory security practice)
Deploy resources in the customer’s region to comply with data residency laws
Create separate Key Vaults per region/customer for better compliance and isolation
Architecture Recommendation:
For multi-country customers, use regional Key Vaults with dedicated app registrations:
UK Customer → Key Vault in UK South + regional app registration
US Customer → Key Vault in East US + regional app registration
Australia Customer → Key Vault in Australia East + regional app registration
This approach ensures:
✅ Compliance with local data protection laws (GDPR, data sovereignty)
✅ Reduced latency (resources closer to users)
✅ Better security isolation
✅ Easier access revocation per customer
Key Vault Access:
Use Managed Identity wherever possible to eliminate credential storage entirely, and implement strict RBAC policies.
Happy to discuss your specific use case in more detail if needed!
Best regards,
Arifhusen